

After studying color theory, students are to make three unique drawings or paintings using three different color schemes. After putting two of those drawings into strips and attaching them to the third drawing, viewers will be surprised to notice that as they walk by these pieces of art, they will change right before their eyes!
Step by step directions are below.
Evaluation:
3 points -- All 3 drawings are colored nicely (Lots of bold color)
4 points -- Quality of finished project (cut accurately, taped nicely, followed directions,etc.)
3 points -- Blending to form three-dimentionality
10 points total.
1. Using three sheets of paper cut to the same size, produce 3 drawings.
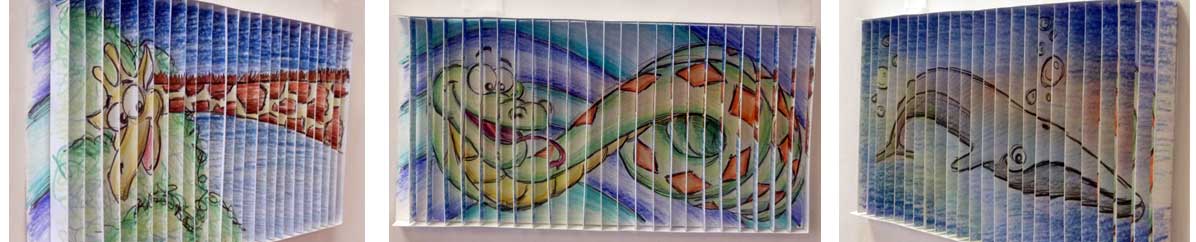

2. On the back of two of the drawings, use a ruler to mark out every half inch on the top and bottom, then draw lines connecting the marks. These will be the cut lines.
3. Number the spaces between lines from left to right on each drawing, keeping all numbers at the top of the page (keep numbers on the back of the drawings so they don't show laer).
4. Cut each drawing along the lines that were drawn in step 2.
5. Turn each strip over and lightly number them according to the numbers on the back. This is so that the strips stay in the correct order when assembling them. Sometimes on a larger drawing the placement of strips are easily confused.
6. Glue the strips of each drawing back to back, gluing number 1 to the corresponding number on the other drawing. 2 gets glued to 2, 3 gets glued to 3, etc.
7. Cut half-inch strips that will be the top and bottom frame of the lenticular drawing and make half-inch marks on each.
8. Tape the top of each strip of the drawings to the top paper strip made in step 7. be sure to line up the ends of the paper strips with each mark on the top paper strip. When finished with this step, the strips should hang like vertical blinds when the top strip is held on both ends above the table/desk.
9. Tape each bottom strip of the drawings to the bottom strip of paper.
10. Put tape strips on the top of the third (background) drawing, Lay the "vertical blinds" on top of the third (background) drawing and fold the tape over onto the "vertical blinds" to secure them. Do the same to the bottom.
Printable instructions